VMWare: How to Set ESXi Sytem Time Using NTP

Once we have set the system and hardware clocks via the CLI, we can move on to set ESXi sytem time using NTP on the vSphere Client:
This is very easily achieved by following these steps from the VMware knowledge base:
  1. Connect to the ESX/ESXi host using the vSphere Client.
  2. Select a host in the inventory.
  3. Click the Configuration tab.
  4. Click Time Configuration.
  5. Click Properties.
  6. Click Options.
  7. Click NTP Settings.
  8. Click Add.
  9. Enter the NTP Server name. For example, pool.ntp.org.

    Note: When entering the multiple NTP Server names, use a comma (,) followed by a space ( ) between the entries.

  10. Click OK.
  11. Click the General tab.
  12. Click Start automatically under Startup Policy.

    Note: It is recommended to set the time manually prior to starting the service.

  13. Click Start and click OK.
  14. Click OK to exit.

esxiad02[1]

Debian Jessie – su, sudo and Wheel Group

Allow Users to su With the Wheel Group or sudo

Users in Jessie are not allowed to su by default and the Wheel group (whose members are allowed to su) is not created by default. Should this be a requirement, follow the steps here to set it up:

Restrict ‘su’ execution

Login as root and uncomment the line below in /etc/pam.d/su, by removing the leading ‘#’.

#auth       required pam_wheel.so

This means that no user can execute su anymore and is the most secure configuration.

Create the Wheel Group

Create the group wheel with root privileges:

# groupadd wheel

Add User to Wheel Group

# usermod -aG wheel <user>

<user> can now execute su.

Optionally (and Insecurely) Trust Users in Wheel

This will put users in the wheel group directly into root without prompting for a password. Edit the /etc/pam.d/su file again and uncomment the following line:

#auth       sufficient pam_wheel.so trust

Forward Email Using ISPConfig and Keep a Copy (Or Not!)

ISPConfig Forward Email to Other Addresses

This article details how to use ISPConfig to forward email to another email address (or addresses) of your choice and also whether to keep a copy on the server.

Many people who use a web-based email like hotmail, gmail or yahoo prefer to use their provider’s interface to pick up and/or send email from their own domain. You can configure their POP3/IMAP collector to retrieve the email for you or alternatively ‘push’ or forward it to that address.

In ISPConfig, this is done using the custom rules under the mailbox settings; depending on which LDA / POP3 / IMAP daemon you are using, the syntax differs slightly – I have shown the syntax for two of the most popular. Dovecot uses sieve syntax and is shown in the images and Courier uses the maildrop syntax – please refer to the footnotes.

Instructions:

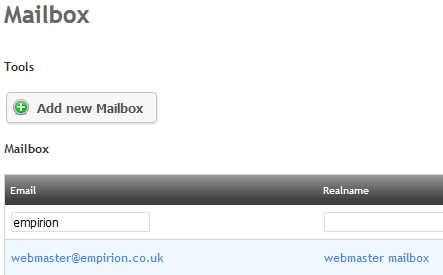
  1. Log into the ISPConfig admin interface and choose “Email Inbox” under the “Email” tab:
    mail-filter-0
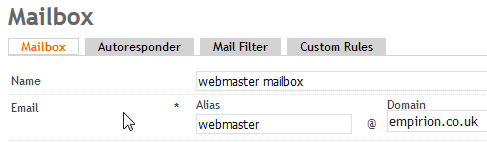
  2. Click on the mailbox for which you want to forward mail:
    mail-filter-1
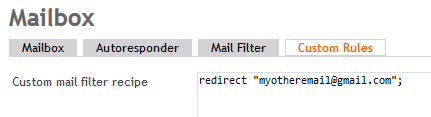
  3. Under “Custom Rules” – to forward email and leave a copy on the server:
    ispconfig forward email
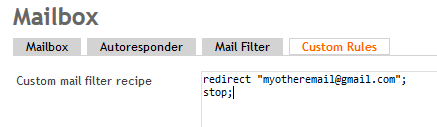
  4. Under “Custom Rules” – to forward email and delete from your server:
    mail-filter-3

Sieve syntax:

cc "!myotheremail@gmail.com"

Maildrop syntax:

redirect "myotheremail@gmail.com";