Build A Complete Linux Media Server – Introduction

Linux Media Server From Scratch!

This series of articles describes how to build a complete linux media server for finding, downloading, organising and streaming media.


Before we start, it goes without saying (but I’m saying it here anyway!) that this is a grey area, that you should already have legal entitlement to watch these shows through your terrestrial TV / cable TV provider and that downloading shows is your backup option.

This is simply a way to change how you store, manage and view the shows which you have already paid for – if people don’t pay for the shows, production companies cut their budgets, actors eschew parts in great dramas and instead plump for making adverts for Coca Cola – in a nutshell, all the cute bunnies and kittens die because of you!! You get the message.


We will be using the following technologies:

To implement the full stack you will need to have usenet access from either your internet provider or one of the many monthly subscription usenet services. There are a few examples of these listed in the usenet configuration article.

We will approach this project in the following order:

  1. Debian installation and configuration
  2. Transmission-daemon installation and configuration
  3. Nzbget installation and configuration
  4. Sonarr installation
  5. Sonarr configuration – due 5th April 2016
  6. Plex Media Server installation and configuration – due 10th April 2016

The linux media server example detailed in this article is built in a virtual machine on ESXi 5.5.

The information provided here draws on other information already available on the internet and will be referenced as such, credit where credit is due!

The links 1-5 above will be activated when the articles are published over the next week – subscribe to be notified of new posts!
f5 “Log disk usage still higher than 80% after logrotate” – No Files Found to Delete

F5 error message “Log disk usage still higher than 80% after logrotate” is issued and “df” shows that the var/log partition is nearly full but “du” finds no files to delete. This article describes how to find the “invisible” log files and regain the disk space.

Description of the Issue

The following error can be seen logged to the console:

011d0004:3: Disk partition var_log has only 7% free
Feb 25 09:25:03 f5-01 emerg alertd[7775]: 01100048:0: Log disk usage still higher than 80% after logrotate and 24 times log deletion

“df” shows that the /var/log partition is nearing its limit:

[admin@f5-01:Active:In Sync] ~ # df -h
Filesystem            Size  Used Avail Use% Mounted on
<snip>
/dev/mapper/vg--db--sda-dat.log.1
                      485M  427M   33M  93% /var/log
<snip>

“du” however shows that there are only a few MBs in the /var/log directory:

[admin@f5-01:Active:In Sync] log # du -h ./ –max-depth=1
<snip>
26M     ./

Cause

Monitor logging has been enabled for e.g. a node which is ongoing. The file however has been deleted but as it is still being written to, the disk space is still in use.

Fix

We simply need to identify fo which node the monitoring has been enabled and then disable it. We can see a list of the files which have been deleted from the log directory with the following command:

[admin@f5edin:Active:In Sync] monitors # lsof | grep deleted | grep log
bigd   6775   root  7w   REG   253,2  407867086  109730 /var/log/monitors/Common_icmp-Common_panel1-0.log.1 (deleted)

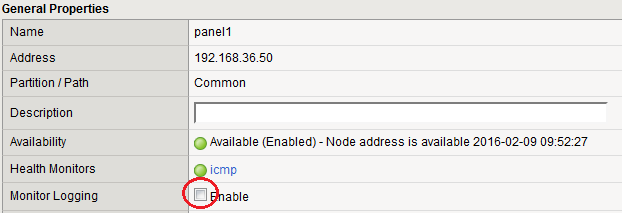
Now go to Local Traffic -> Nodes -> Select the node and uncheck the monitor logging box:

monitor logging

Running “df” should now show plenty of recovered disk space:

[admin@f5-01:Active:In Sync] log # df -h
Filesystem            Size  Used Avail Use% Mounted on

/dev/mapper/vg--db--sda-dat.log.1
                      485M   36M  424M   8% /var/log

Purge and Shrink vCenter Database

How to Shrink vCenter Database

This articles describes how to purge old data from your vCenter DB and shrink vCenter database files in order to free up space; running out of disk space brings a whole host of potential problems with complete outage in a worst case scenario.

This example shows a Windows 2008 v5.5 vCenter server running a MSSQL database and is broken down into five  procedures:

  1. Stop the vCenter Server service – very important otherwise major corruption will occur!
  2. Set the retention policy on your vCenter server – optional
  3. Purge old data from your existing database using MS SQL Server Manager
  4. Shrink database using MS SQL Server Manager
  5. Restart the vCenter Server service

As with all operations of this nature, a full backup / snapshot of your database is advised before proceeding!

Stop vCenter Service

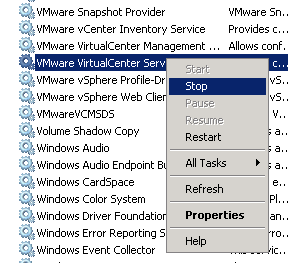
  • Open your services configuration pane in your favourite server management console snap-in, locate the VMware VirtualCenter Server service, right-click and choose “Stop” –  this may take a few minutes to complete.

stop vcenter service

Set Retention Policy

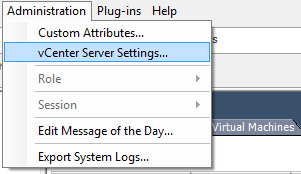
  • In the vSphere client, click “Administration” and then “Database Retention Policy” in the newly-opened window.

vcenter settings

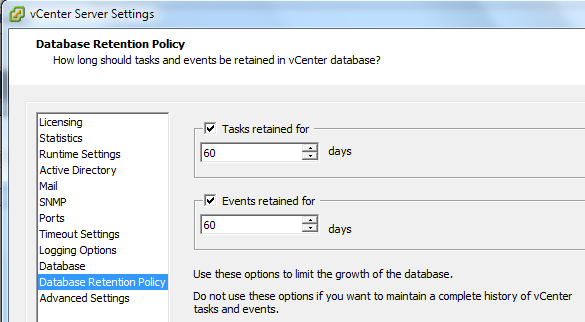
  • Here you can select the length of time your logs will be kept for before an automatic purge is executed.

db retention policy settings

Purge Old Data

Once you have set your retention policy you can purge your old data.

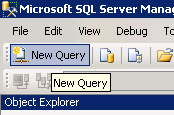
  • Open a new query in MS SQL Server Manager and paste in the contents of the sql script on the link below.

open a new query

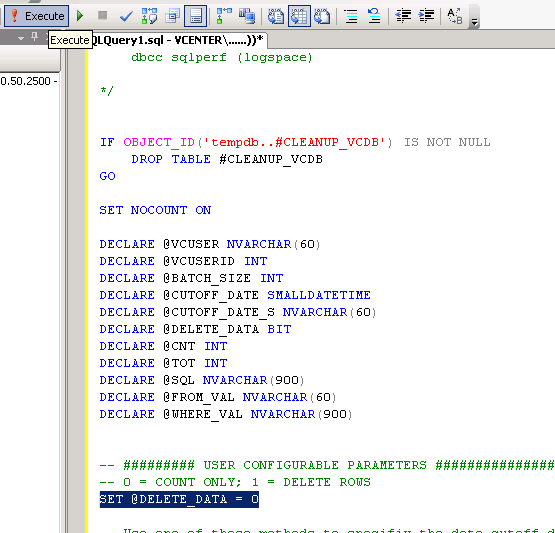
  • Click “Execute” to run the script. By default, the script will only count the rows of data which can  be deleted – do this as a first dry run before committing to deletion.

execute script

  • Once you have performed the above test, change the value of DELETE_DATA to 1 and then click “Execute” – the script may return a “non-updateable” error which can be safely ignored.
  • Download the script: VCDB_table_cleanup_MSSQL


Shrink vCenter Database

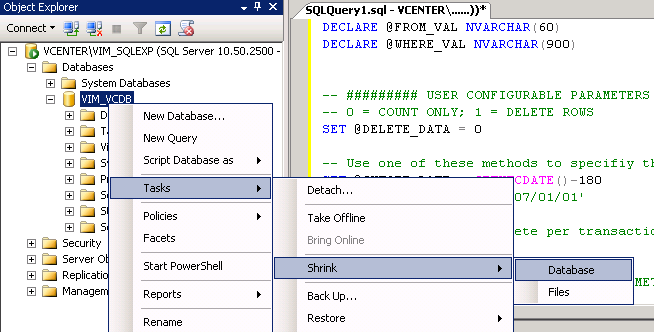
  • Open MS SQL Server Manager and locate the database (default: VIM_VCDB) in Object Explorer, right-click -> Tasks -> Shrink -> Database]

shrink vcenter database

Restart vCenter Service

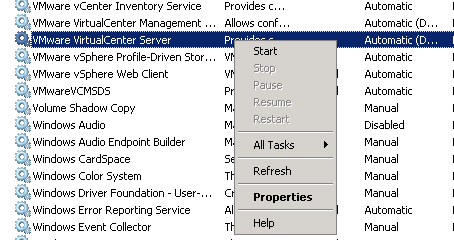
  • In the services configuration pane, right-click “VMware VirtualCenter Server” and choose “Start” – again this may take a minute or two to complete. When done, test that you can log Back in with either the web gui or vSphere client.

start vcenter service