Linux: PrivateInternetAccess Using OpenVPN and Squid Proxy – Part 4

PrivateInternetAccess Using OpenVPN and Squid Proxy – OpenVPN Configuration

This article in the series deals with getting the OpenVPN service up and running with PrivateInternetAccess and how to configure our routes to allow us to selectively channel our traffic through it.

As we already installed OpenVPN previously, we can jump straight in: we will need to download the PrivateInternetAccess-specific config files and then set up the software to use these; we’ll also set up a username / password file for the service to use so that we don’t have to enter them every time we want to connect.

1. Download the PrivateInternetAccess VPN config files from the website

The files can be found at the following link, all zipped up and ready to download: https://www.privateinternetaccess.com/openvpn/openvpn.zip

Fetch these into the /etc/openvpn directory using wget:
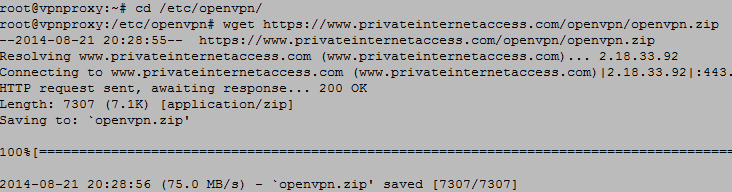
ScreenClip

Unzip the files using the “unzip” command:

ScreenClip

Tip: if the unzip command is not found, you may need to install it using: “apt-get install unzip"

 2. Select the Config File You Wish to Use

The OpenVPN service looks for a file called “server.conf” in the /etc/openvpn directory; the config files above are completed config files so we can either:

a) Rename one of them to server.conf OR much preferably

b) Create a shortcut called server.conf and link it to whichever config file we want to use. This is much better as the name of the config file relates to where your VPN traffic is going to “break out”: i.e. if you link server.conf to “UK London.ovpn” then your traffic will appear with a London IP address. If, however, you want to use something like Hulu which is only available in the US then you would like server.conf to e.g. “US West.ovpn.”

This is very simply done by using the “ln” command as follows:

ln -s <file-to-link-to> <name-of-your-shortcut>

 If we wanted to break out in US West then we would use the following command:

ln -s “/etc/openvpn/US West.ovpn” /etc/openvpn/server.conf

which would create a shortcut called server.conf in the /etc/openvpn directory pointing to the “/etc/openvpn/US West.ovpn” configuration file.

ScreenClip

3. Configure the Username / Password File

The configuration above as it is will work but you will be prompted every time you want to connect for a username and password. To get around this for convenience (and also if you want your VPN to connect automatically) then we need to do the following:

a) Create a simple file with two lines – the first line should contain the username, the second the password. In this example, we echo the username and password into a file called “.pia” in the /root directory:

ScreenClip

Note the first command has one angle bracket “>” and the second one has two “>>” – the first one creates the empty file or blanks it if it already exists and copies the text into it. The second one appends the text to it. Use the “cat” command to view the contents of the file as shown above.

For security, set the permissions on the /root/.pia file to 400 – this means that only root can access it and it will be read-only :

chmod 400 /root/.pia

b) Change the configuration files to use the password file we just created: to do this we need to open each configuration file we want to use, locate the line reading:

auth-user-pass

and change it to:

auth-user-pass /root/.pia

and then save the file. We’re nearly ready to go but first:

4. Configure Static Routes Back to Your Internal Networks!!!

This is only applicable if your proxy is in a different subnet than the one your client is in. In our example, we are connecting from our LAN (172.16.16.0/24) to the proxy in our DMZ (192.168.101.0/24). Once the VPN comes up on our proxy machine, it will become the default gateway meaning that suddenly you won’t be able to access it over the network!

To bypass this, we need to add static routes back to our internal networks, so going with our example network diagram we would need to add a route to 172.16.16.0/24 via 192.168.101.1:

route add -net 172.16.16.0 netmask 255.255.255.0 gateway 192.168.101.1

Now that our communication channels are sorted, let’s get going!

5. Restart the OpenVPN Service

Using the “service openvpn restart” command, you should see the following – we’re sorted!

ScreenClip

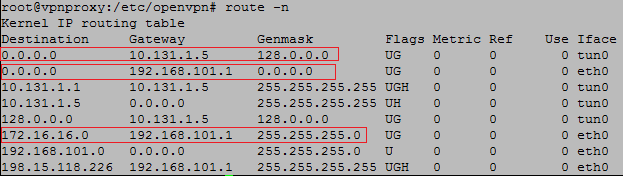
Check your routing table with “route -n”:
ScreenClip

  • The first entry in red shows our default VPN gateway – going out of “tun0” – our virtual VPN network interface.
  • The second entry is our standard default gateway for our local subnet.
  • The third is the static route we entered to allow the proxy in the DMZ to talk back to our client’s network.

If you do a traceroute, you’ll see that the first hop is going through the VPN instead of your standard gateway:

ScreenClip

6. Configure Your Browser / Torrent Application to Use the Proxy

You will need to configure your browser or other application to use the proxy – there are many tutorials out there already so a swift google for your particular browser will have you on your way quickly. You simply need to set the parameters to use the IP of the proxy and port 3128!

Please comment below if you run into any problems and we’ll do all we can to help!
VMWare: Connect a USB Device to a VM in ESXi

Connect a USB Device to a VM in ESXi

This article describes how to connect a USB device to a vm in ESXi – for example a storage device, camera, USB handset etc. etc. Whilst previously not possible, since ESXi 5.0 this is now reality, much to the relief of many, many people!

1. Add a VM USB Controller

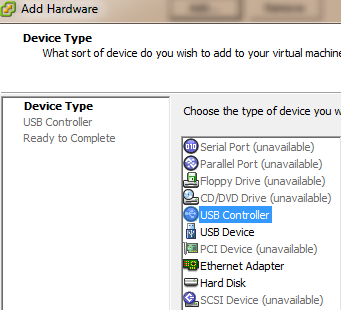
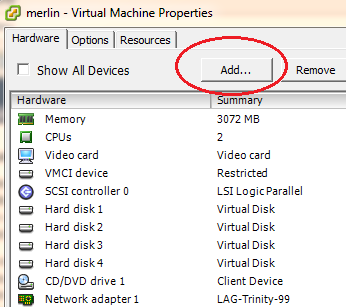
Firstly, your VM needs to have a USB controller; this is added as standard to most new virtual machines but if one is not present then we need to add it – open your VM settings and click the “Add” button:

Connect a USB Device to a VM in ESXi

Choose “USB Controller” and click “Next”; when prompted for the controller type, choose “EHCI+UHCI” for best compatibility or “xHCI” for USB 3.0 support. Note: xHCI USB 3.0 is only supported with Linux VMs currently – see this documentation for further details.

Connect a USB Device to a VM in ESXi

Once complete, you should see something akin to the following in your VM properties:

Connect a USB Device to a VM in ESXi

Excellent! Now let’s add a USB device to our VM:

2. Add a USB Device to the VM

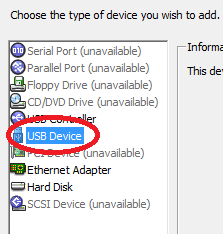
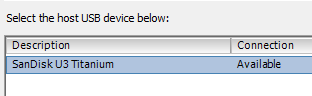
Insert a USB device into one of the ports on your ESXi host. For this example I have used a Sandisk storage device. Open your VM machine properties and once again, click on “Add Hardware.” This time, choose “USB Device”: if your device has been correctly recognised by your ESXi host then it will show up on the next screen:

Connect a USB Device to a VM in ESXi     —–>       Connect a USB Device to a VM in ESXi

Click “Next,” “Finish” and lastly “OK” to complete the reconfiguration of the VM. Congratulations! Your USB device is now added.

3. Mount the Storage Device (*nix Only)

If you have just added a storage device to a Windows VM then you should see it pop up in explorer shortly. If you are on Linux / Unix / FreeBSD etc then you will need to mount your drive. Firstly we will need to find out what ID it has been assigned by the operating system – the easiest way to do this is to check the last entries in “dmesg” after adding the device:


[1546647.937025] usb 1-1: new high-speed USB device number 10 using ehci_hcd
[1546648.363146] usb 1-1: New USB device found, idVendor=0781, idProduct=5408
[1546648.363152] usb 1-1: New USB device strings: Mfr=1, Product=2, SerialNumber=3
[1546648.363157] usb 1-1: Product: U3 Titanium
[1546648.363160] usb 1-1: Manufacturer: SanDisk Corporation
[1546648.363164] usb 1-1: SerialNumber: 000015E96A63058A
[1546648.364943] scsi11 : usb-storage 1-1:1.0
[1546649.369282] scsi 11:0:0:0: Direct-Access SanDisk U3 Titanium 3.21 PQ: 0 ANSI: 2
[1546649.373306] scsi 11:0:0:1: CD-ROM SanDisk U3 Titanium 3.21 PQ: 0 ANSI: 2
[1546649.374503] sd 11:0:0:0: Attached scsi generic sg5 type 0
[1546649.399562] sd 11:0:0:0: [sde] 8015505 512-byte logical blocks: (4.10 GB/3.82 GiB)
[1546649.403475] sr1: scsi3-mmc drive: 8x/40x writer xa/form2 cdda tray
[1546649.403817] sr 11:0:0:1: Attached scsi CD-ROM sr1
[1546649.404505] sr 11:0:0:1: Attached scsi generic sg6 type 5
[1546649.417867] sd 11:0:0:0: [sde] Write Protect is off
[1546649.417873] sd 11:0:0:0: [sde] Mode Sense: 03 00 00 00
[1546649.422634] sd 11:0:0:0: [sde] No Caching mode page present
[1546649.422800] sd 11:0:0:0: [sde] Assuming drive cache: write through
[1546649.451967] sd 11:0:0:0: [sde] No Caching mode page present
[1546649.452074] sd 11:0:0:0: [sde] Assuming drive cache: write through
[1546649.480289] sde: sde1
[1546649.506074] sd 11:0:0:0: [sde] No Caching mode page present
[1546649.506184] sd 11:0:0:0: [sde] Assuming drive cache: write through
[1546649.506332] sd 11:0:0:0: [sde] Attached SCSI removable disk

The most relevant part is the line reading “[1546649.480289] sde: sde1” – this tells us that the disk has been assigned the descriptor “sde” and the single partition on it “sde1“.

From here we can do a standard *nix mount command and access it normally – in this example I am mounting the newly added sde1 device to a pre-existing directory “/mnt/usb”:

root@merlin:~# mount /dev/sde1 /mnt/usb

We can check the operation has been successful by issuing the “mount” command on its own

root@merlin:~# mount
sysfs on /sys type sysfs (rw,nosuid,nodev,noexec,relatime)
...
...
...
/dev/sde1 on /mnt/usb type vfat (rw,relatime,fmask=0022,dmask=0022,codepage=cp437,iocharset=utf8,shortname=mixed,errors=remount-ro)

Job done! If this has been of interest to you, check out some of the other articles in the VMWare category!

Linux: PrivateInternetAccess Using OpenVPN and Squid Proxy – Part 3

PrivateInternetAccess Using OpenVPN and Squid Proxy – Squid Configuration

This article in the series walks us through using webmin and configure the squid proxy server to accept and forward connections for clients.

1. Access the interface on https://192.168.101.6:10000

Squid Proxy

2. On the left-hand side control panel, locate “Unused Modules,” expand this and scroll down to “Squid Proxy Server.” You will see the following error message – click on the circled link to adjust the module parameters:

Squid Proxy

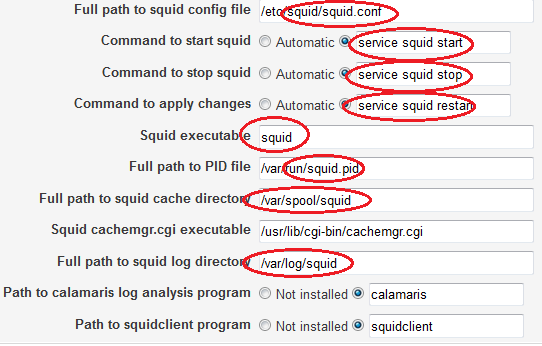
3. Change all references to “squid3” to “squid” as shown in the circled fields below, click “Save” when finished.

Squid Proxy

4. As squid denies all connections by default, we need to allow users access. In this example we’re going to allow *all* users to access the proxy – you can of course create access lists based on users / groups etc. but that is beyond the scope of this tutorial. Click on the “Access Control” icon to continue.

Squid Proxy

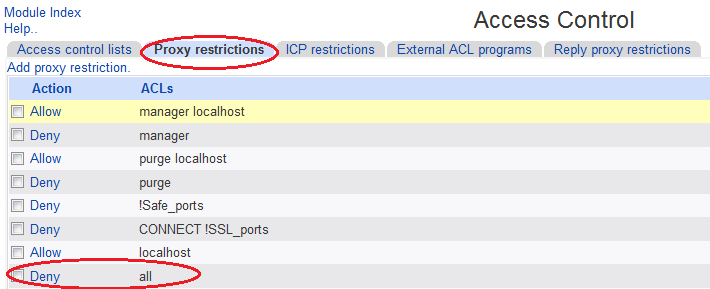
Navigate to the “Proxy Restrictions” tab and click the “Deny” link next to “all”:

Squid Proxy

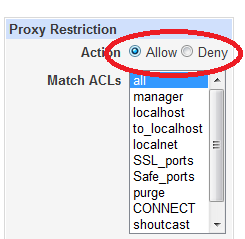
Now simply change the “Deny” to “Allow” and don’t forget to click “Apply changes” on the top right-hand side of the screen!

Squid Proxy        Squid Proxy

Job done! You can now check that you have access to the proxy by configuring your browser to use a proxy and then browsing to a website, e.g. www.whatsmyip.org. Here you should see the public IP address of your router.

Now – let’s get anonymised!