

This article guides you through setting up the Wireshark packet analyser to interpret captures as a Checkpoint FW-1 capture. This will only have an effect on captures taken using “fw monitor”, all other captures will read as normal.
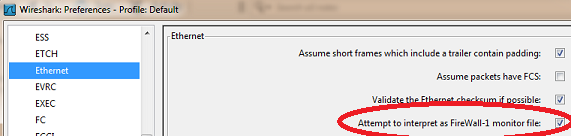
1. Edit -> Preferences -> Protocols -> Ethernet -> Check “Attempt to interpret as Firewall-1 monitor file”:
2. Edit -> Preferences -> User Interface -> Columns -> click “New” to add a new column – give it a title of FW Monitor and choose FW-1 monitor if/direction as the format:

You should now have an extra column when you open a capture file – if you open an fw monitor capture file you will see 4 entries for each packet tracked as they go in one interface and out of another.
The ethernet interfaces e.g. eth0, eth1 etc etc are marked with either i, I, o or O.
i = pre-incoming ……….. I = post-incoming
o = pre-outgoing ……….. O = post outgoing
So ..
1 i eth0 <- pre-IN: this is the packet as it arrives at the interface
2 eth0 I <- post-IN: this is the packet leaving the interface, now in the CheckPoint kernel
3 o eth1 <- pre-OUT: this is the packet having left the kernel and arriving at the egress interface
4 eth1 O <- post-OUT: this is the packet leaving the interface
This is dead handy for loads of troubleshooting situations, an ovious one is NAT being applied, e.g.:
A packet from internal IP 10.1.1.1 headed for a destination on the internet 4.2.2.1 through a firewall with an external IP of 81.82.83.84 would look something like:
SRC DST FW1
10.1.1.1 4.2.2.1 i eth0
10.1.1.1 4.2.2.1 eth0 I
10.1.1.1 4.2.2.1 o eth1
81.82.83.84 4.2.2.1 eth1 O <- NAT has been applied and the source IP is now the firewall’s external IP