Checkpoint: Change the Default WebUI Port in SecurePlatform and Gaia

The WebUI default access port is HTTPS 443. This can conflict when installing some Check Point products, e.g. Endpoint Security Server. In order to mitigate this, change the default webUI port as follows:

SecurePlatform

Log in to the SecurePlatform CLI in Standard mode, and run this command:

webui enable <port_number>

You should see the following:

Shutting down cp_http_server_wd [OK]
Shutting down cpwmd_wd [OK]
Running cp_http_server_wd [OK]
Running cpwmd_wd [OK]

To disable access to the WebUI, run the command:

webui disable

Gaia

To set the Webui port on Gaia enter clish and run:

CLISH> set web ssl-port <port number>

CLISH> save config

** Please read below – this must also be mirrored through SmartDashboard otherwise every policy installation will revert to the default 443 **

To change it through SmartDashboard:

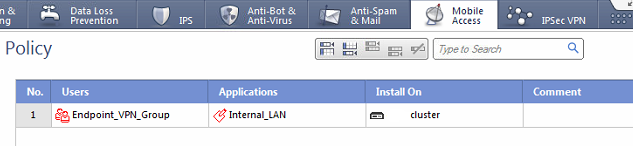
Open ‘SmartDashboard > gateway/cluster object > platform portal’, and in the “Main URL” add the relevant port, for example:

https://143.100.80.100:xxx

This will force the machine to use port xxx. In the case of a cluster, this will also work for both members.

If this is not changed, every policy installation will change the port back to the default 443.

Checkpoint: Getting Serial Network Extender VPN (SNX) to work with Mobile Access Blade (MAB)

Explanation:

Before MAB came along, SNX terminated on the IPSEC VPN blade and life was good. You browsed to the external IP, were presented with a popup window, entered your credentials and had good old network connectivity tunnelled over SSL.

Then executives jumped on the iPad / tablet bandwagon and the Mobile Access Blade was born. The MAB now intercepted all traffic and everything terminated on it. SNX appeared to no longer exist but at least the executives were happy as they could access OWA on their mobile devices. And god frowned. Now on to the good stuff:

Symptoms and Status:

  • No SNX window opens when you https to your gateway’s IP – you get the Mobile Portal only
  • Once you log into the portal, there is no “Connect” button to allow you proper network access

Notes / Caveats:

  • Checkpoint Mobile VPN on tablets works, IP network connectivity is present.
  • Not to be confused with Checkpoint Mobile- this only allows published applications. See references below for details)
  • The MAB portal cannot be bypassed to provide direct access to SNX, it is necessary to sign in to MAB and then connect from there.

Fix:

In order to bring back SNX, we need to:

  • Specify access to each subnet we want the SNX user to be able to access
  • Publish these as “Native Applications” – if there are no native applications then the “Connect” button will not be shown

1. Make sure Mobile Access Blade is selected

Mobile Access Blade


2. Define address ranges for each subnet you want VPN users to access:

addr_range


3. Create a rule in the MAB policy to allow either a group of users or just All_Users to access the resource: policy


4. PUSH THE POLICY!!

5. Log in to the portal:

portal sign in


6. Hit the connect button

connect1 connect1


7. Connected, job done!

connect2


References:

Below are the references for android but there are also apps for iPhone and iPad in the iTunes store.

Android Mobile:

  • https://supportcenter.checkpoint.com/supportcenter/portal?eventSubmit_doGoviewsolutiondetails=&solutionid=sk65314
  • https://play.google.com/store/apps/details?id=com.CheckPointVpn&hl=en

Android Mobile VPN:

  • https://supportcenter.checkpoint.com/supportcenter/portal?eventSubmit_doGoviewsolutiondetails=&solutionid=sk84141
  • https://play.google.com/store/apps/details?id=com.checkpoint.VPN&hl=en

Checkpoint: Recover / Recreate a Dead Checkpoint Smartcenter from Files in $FWDIR

Smartcenter dead, only the disk survives. All credit to RStewart from cpshared for sharing the knowledge found in sk article sk32508 article which unfortunately is internal only. I have only re-worded and re-formatted in places. If anything is wrong or missing, please let me know; I went through this process a couple of weeks ago and am now writing from memory ..

  • Take the following 3 files from the SC’s conf directory ($FWDIR/conf) :
    • objects_5_0.C
    • rulebases_5_0.fws
    • fwauth.NDB
  • Build a new SmartCenter of the same version
  • Install the Check Point software from the CD and reboot.
  • Go through sysconfig and configure the OS and the Check Point software. Set the hostname to match the CMA name as closely as you can.
  • Do not reboot and don’t start the products!
  • Put the 3 files above into $FWDIR/conf.
  • Reboot and once the server is up, check you can log in through the dashboard. If you can’t then either something very bad has happened or the instructions above weren’t followed to the T.

Once you have successfully logged in with dashboard, you can progress to the next phase:

  • Follow the process to rename a SmartCenter, which is found in the sk article: https://supportcenter.checkpoint.com/supportcenter/portal?eventSubmit_doGoviewsolutiondetails=&solutionid=sk42071

Once the above is complete you will need to do a brutal fwm sic_reset – this involves manually removing any certificates from the objects file.

  • Follow the sk article below to remove the certificates: https://supportcenter.checkpoint.com/supportcenter/portal?eventSubmit_doGoviewsolutiondetails=&solutionid=sk10451
  • Give it a reboot and you should be good to go

If you’re doing an upgrade from an unsupported version to R7x.x one, the following docs may be useful:

  • http://fireverse.org/wp-content/uploads/2011/03/Upgrade-to-R70.pdf
  • http://fireverse.org/wp-content/uploads/2011/03/Upgrade-to-R71.pdf
  • http://fireverse.org/wp-content/uploads/2011/03/Upgrade-to-R75.gif

Original reference: https://www.cpshared.com/forums/archive/index.php/t-1163.html