

CLI: Create a Self IP to Allow BigIP Management

Create a Self IP to Allow BigIP Management via the CLI

This article details how to create a self ip  to allow bigip management on the command line. The need arose when a primary firewall failed and the only entry to the network was an ssh session to the DR BigIP via a jump box.

For the purpose of this article we are using the following IP representations:

x.x.x.100 – eXternal IP

i.i.i.100 – Internal IP

1. Enter the traffic management shell tmsh:

[admin@bigip:Active:Standalone] tmsh
admin@(bigip)(cfg-sync Standalone)(Active)(/Common)(tmos)#

2. If there is already a self IP on the external vlan you can modify the port lockdown settings to allow https to the machine but only if you have no virtual servers already using the https port.

admin@(bigip)(cfg-sync Standalone)(Active)(/Common)(tmos)# modify net self x.x.x.100 allow-service default

This will allow all the default ports, shown by “list net self-allow”:

admin@(bigip)(cfg-sync Standalone)(Active)(/Common)(tmos)# list net self-allow
net self-allow {
defaults {
ospf:any
tcp:domain
tcp:f5-iquery
tcp:https
tcp:snmp
tcp:ssh
udp:520
udp:cap
udp:domain
udp:f5-iquery
udp:snmp
}
}

3. In this case the self IP was already used by a virtual server with a pool of https machines behind it so a new self ip was necessary. Choose another ip on the same external subnet:

admin@(bigip)(cfg-sync Standalone)(Active)(/Common)(tmos)# create net self x.x.x.101/32 vlan external allow-service default

4. We can now list our self ips and the level of access associated with them:

admin@(bigip)(cfg-sync Standalone)(Active)(/Common)(tmos)# list net self
net self x.x.x.101/32 {
address 90.152.115.244/32
allow-service {
default
}
traffic-group traffic-group-local-only
vlan external
}
net self x.x.x.101 {
address 90.152.115.243/29
allow-service {
none
}
traffic-group traffic-group-local-only
vlan external
}
net self i.i.i.100 {
address i.i.i.100/24
allow-service {
default
}
traffic-group traffic-group-local-only
vlan internal
}

5. We can now access our BigIP on https://x.x.x.101 !
How to Set a Static IP and DNS in Ubuntu 14.04 or Later

How To Set A Static IP And DNS In Ubuntu 14.04 or Later

This article details how to set a static IP and DNS in Ubuntu: version 14.04 and later no longer allow direct editing of /etc/resolv.conf directly.

Using something like “echo nameserver 8.8.8.8 >> resolv.conf” will work temporarily but will be overwritten as soon as the  machine is rebooted or the networking service restarted.

You must now modify /etc/resolvconf/resolv.conf.d/head or /etc/resolvconf/resolv.conf.d/tail.

/etc/resolv.conf is written from:

  1. /etc/resolvconf/resolv.conf.d/head
  2. DNS set on interfaces
  3. /etc/resolvconf/resolv.conf.d/base
  4. /etc/resolvconf/resolv.conf.d/tail

While any and all of these work, it is much simpler to set this in the interface config aong with a static IP:

Edit /etc/network/interfaces and change the following:

Notes:

  • Your network card may be referred to as eth0, eth1, ens32 etc.
  • Change your dns-nameservers to whatever you want them to be – the above ones are google’s own.
  • The IP addressing must also be tailored to whatever your home router is configured with.
  • Leaving the dns-nameservers directive out will result in the DNS servers from your ISP or home router being used instead.
auto eth0
iface eth0 inet dhcp

to:

auto eth0 
  iface eth0 inet static
  address 192.168.0.50
  netmask 255.255.255.0
  gateway 192.168.0.1
  network 192.168.0.0
  broadcast 192.168.0.255
  dns-nameservers 8.8.8.8 8.8.4.4

Finally, restart your ethernet:

$ sudo service networking restart
$ sudo ifdown eth0
$ sudo ifup eth0

1100 Appliance SIP Calls Drop After 15 Minutes

SIP Calls Drop After 15 Minutes –

CheckPoint 1100 Appliance

There are many different reasons why SIP calls drop – if they regularly drop after a consistent period it’s very often a faulty SIP session timer or failure to send keep-alive packets. There are others however and this article highlights a parameter, which if set to false,  will make Checkpoint 1100 appliance SIP calls drop after 15 minutes or another fixed period of time.

The reason is down to the fact that the CheckPoint periodically changes the port which the SIP messaging system communicates over. This means that the SIP re-invites and are not received by the phone system behind the firewall and the call will end after the remote side has not received a reply to any of the INVITEs sent after the specified time-out period (15 minutes in this case).

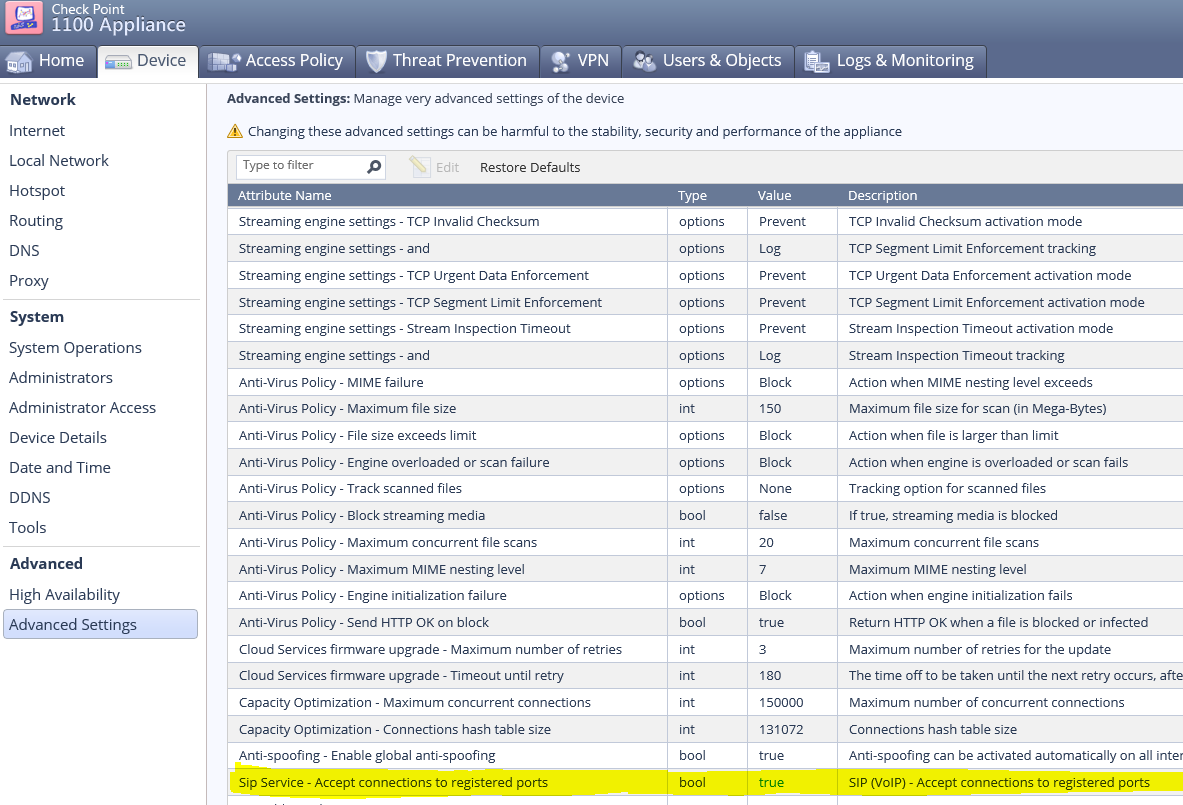
There is a boolean parameter in the 1100 under Device -> Advanced -> Advanced Settings named “Sip Service – Accept connections to registered ports” which is set to false by default:

Accept connections to registered ports
Click to view full settings page

Set this parameter to true and all should be well!

Notes: This is an issue across many firewall vendors. For example the SonicWall equivalent parameter is named “Enable Consistent NAT.”